CHIP8模擬器開發-來寫程式吧

虛擬硬體環境建立
根據第一篇文章的CHIP8硬體環境來實作,實作過程需要了解各個資料型態的大小,所以整理了下表供參考
| 型態 | 大小 | 範圍 |
|---|---|---|
| char | 1 byte | -128 ~ 127 |
| short | 2 bytes | -32768 ~ 32767 |
| unsigned char | 1 byte | 0 ~ 255 |
| unsigned short | 2 bytes | 0 ~ 65535 |
- 建立一個CHIP8的物件並加入基本硬體規格與參數
Chip8.h
class Chip8{
public:
    unsigned short opcode;
    unsigned char memory[4096];
    unsigned char reg[16];
    unsigned short I;
    unsigned short pc;
    unsigned char gfx[64 * 32];
    unsigned char delay_timer;
    unsigned char sound_timer;
    unsigned short stack[16];
    unsigned short sp;
    unsigned char key[16];
}
- 加入初始化CHIP8的function
Chip8.h
class Chip8{
public:
    //...
    void initialize();
}
Chip8.cpp
void Chip8::initialize() {
    opcode = 0;
    I = 0;
    //Memory從0x200以後才能直接存取,所以初始化為0x200
    pc = 0x200;
    sp = -1;
    drawFlag = true;
    delay_timer = 0;
    sound_timer = 0;
    for (int i = 0; i < 4096; i++) {
        memory[i] = 0;
    }
    for (int i = 0; i < 16; i++) {
        reg[i] = 0;
    }
    for (int i = 0; i < 2048; i++) {
        gfx[i] = 0;
    }
    for (int i = 0; i < 16; i++) {
        stack[i] = 0;
    }
    for (int i = 0; i < 16; i++) {
        key[i] = 0;
    }
    //亂數種子產生器
    srand(time(NULL));
}
讀取ROM
Chip8.h
class Chip8{
public:
    //...
    void initialize();
}
Chip8.cpp
bool Chip8::loadGame(const char *filename) {
    // 初始化CHIP8
    initialize();
    print("Load Game : %s\n", filename);
	// Load ROM from file
    FILE *filePtr = fopen(filename, "rb");
    if(filePtr == NULL){
        printf("File is not found!\n");
		return false;
    }
    // 取得檔案大小,最大不能超過4096-512
    // 將檔案指針移動到檔案最後方
    fseek(filePtr, 0L, SEEK_END);
    // 透過ftell函式取得目前指針到檔案開頭共有多少byte
    long fileSize = ftell(filePtr);
    // 將指針移回到檔案開頭
    fseek(filePtr, 0L, SEEK_SET);
    print("File Size : %d\n", fileSize);
    if (fileSize > (4096 - 512)) {
        print("File is too big\n");
		return false;
    }
    // 宣告一塊memory做為讀檔的buffer
    char * buffer = (char*)malloc(sizeof(char) * fileSize);
    // 使用fread將file指標複製到buffer中
    fread(buffer, 1, fileSize, filePtr);
    print("Loading file....\n");
	if (buffer == NULL) {
		printf("Memory error\n");
		return false;
	}
    // 一個一個讀進去Chip8的memory當中
    for (int i = 0; i < fileSize; i++) {
        memory[512 + i] = buffer[i];
    }
    print("ROM Loaded!\n");
	return true;
}
實作Chip8 Cycle
由於指令集的實作程式碼很長一大串,所以挑幾個比較特別的Opcode視作過程當成範例,剩下的舉一反三即可。
還記得CPU執行指令的過程嗎,必須先Fetch,Decode才能Execute和Store
Fetch
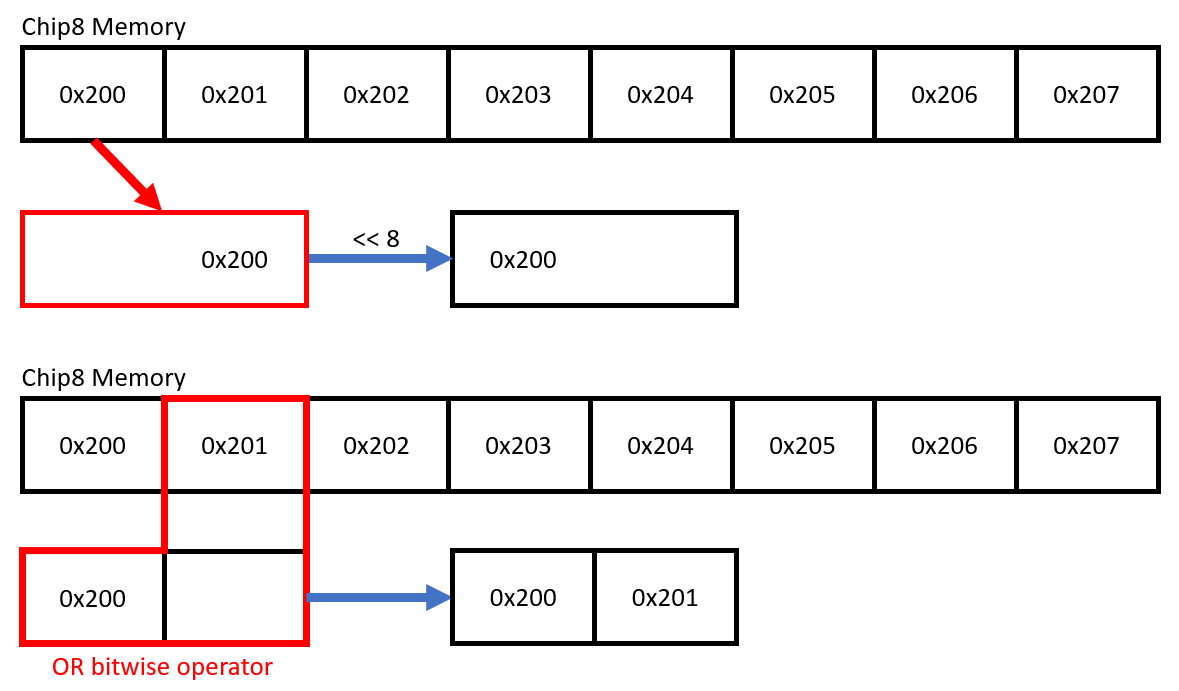
由於剛剛讀進來的ROM是從512(0x200)開始往下放,而每個Opcode都是2 bytes,所以先從memory讀1byte之後再將其往左推,與下一個byte做OR運算
opcode = memory[pc] << 8 | memory[pc + 1];

Decode & Execute
00E0 - CLS
case 0x00E0:
    for (int i = 0; i < 2048; i++) {
        gfx[i] = 0x0;
    }
    //drawflag設為true表示執行完這個opcode之後要重新繪圖
    drawFlag = true;
    // 執行結束,跳到下一個opcode
    pc += 2;
    break;
00EE - RET
case 0x000E:
    // 把stack最上層存放的值丟給PC
    pc = stack[sp];
    //Stack減一層
    sp--;
    pc += 2;
    break;
0x1NNN - JP addr
case 0x1NNN:
    pc = opcode & 0x0FFF;
    break;
3XNN - SE Vx, byte
這個opcode需存取到Vx暫存器,reg[(opcode & 0x0F00) >> 8]opcode與0x0F00作AND運算的原因是此運算會將F位置的值保留,其餘歸零,留下我們要的值之後向右位移8bytes即為我們所要的值。
舉例:38AAdecode的過程如下
38AA -> 0800 -> 0008,此時值為8,帶入reg[8]即為我們所要的Vx
case 0x3000:
    if (reg[(opcode & 0x0F00) >> 8] == (opcode & 0x00FF)) {
        // 每個opcode為2bytes,加4即為跳過一個opcode
        pc += 4;
    }
    else {
        pc += 2;
    }
    break;
DXYN - DRW Vx, Vy, nibble
case 0xD000:{
    //從opcode中取出我們所要的值
    unsigned short x = reg[(opcode & 0x0F00) >> 8];
    unsigned short y = reg[(opcode & 0x00F0) >> 4];
    unsigned short height = (opcode & 0x000F);
    unsigned short rowPixel;
    //將flag暫存器歸零
    reg[0xF] = 0;
    for (int i = 0; i < height; i++) {
        //讀出I位置一列的值
        rowPixel = memory[I + i];
        for (int j = 0; j < 8; j++) {
            // 在列上一個一個pixel讀取
            if ((rowPixel & (0x80 >> j)) != 0) {
                // 若要填入的像素上已有存在畫面,則判定碰撞
                // 碰撞將VF設為1
                if (gfx[x + j + (y + i) * 64] == 1) {
                    reg[0xF] = 1;
                }
                // XOR顯示
                gfx[x + j + (y + i) * 64] ^= 1;
            }
        }
    }
    // 需更新畫面
    drawFlag = true;
    pc += 2;
    break;
}
FX33 - LD B, Vx
case 0x0033:
    //取得百位數後放至memory[I]
    memory[I] = reg[(opcode & 0x0F00) >> 8] / 100;
    //取得十位數後放至memory[I + 1]
    memory[I + 1] = (reg[(opcode & 0x0F00) >> 8] / 10) % 10;
    //取得個位數後放至memory[I + 2]
    memory[I + 2] = reg[(opcode & 0x0F00) >> 8] % 10;
    pc += 2;
    break;
列舉以上Opcode的做法供參考,其餘opcode實作方法請參閱完成品Source
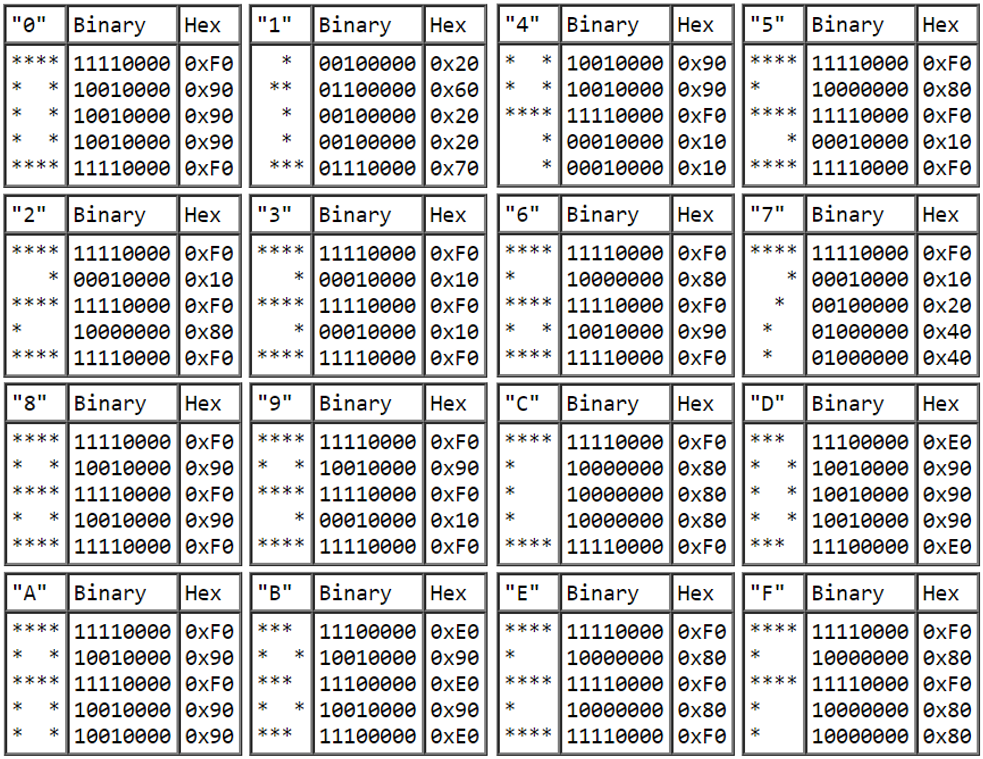
加入預設字符集
Chip8.h
class Chip8 {
public:
    unsigned char chip8_fontset[80] =
    {
      0xF0, 0x90, 0x90, 0x90, 0xF0, // 0
      0x20, 0x60, 0x20, 0x20, 0x70, // 1
      0xF0, 0x10, 0xF0, 0x80, 0xF0, // 2
      0xF0, 0x10, 0xF0, 0x10, 0xF0, // 3
      0x90, 0x90, 0xF0, 0x10, 0x10, // 4
      0xF0, 0x80, 0xF0, 0x10, 0xF0, // 5
      0xF0, 0x80, 0xF0, 0x90, 0xF0, // 6
      0xF0, 0x10, 0x20, 0x40, 0x40, // 7
      0xF0, 0x90, 0xF0, 0x90, 0xF0, // 8
      0xF0, 0x90, 0xF0, 0x10, 0xF0, // 9
      0xF0, 0x90, 0xF0, 0x90, 0x90, // A
      0xE0, 0x90, 0xE0, 0x90, 0xE0, // B
      0xF0, 0x80, 0x80, 0x80, 0xF0, // C
      0xE0, 0x90, 0x90, 0x90, 0xE0, // D
      0xF0, 0x80, 0xF0, 0x80, 0xF0, // E
      0xF0, 0x80, 0xF0, 0x80, 0x80  // F
    };
}
-
字符對應方法

繪圖引擎
本篇範例採用的是freeglut(OpenGL),因為筆者本身對OpenGL也不是很熟,所以就不多做解釋,用你喜歡的就可以了,當然也可以不用繪圖引擎,直接在命令列上以文字方式繪圖也行得通。
鍵盤輸入
Source.cpp
void controller(unsigned char key, int x, int y) {
    if (key == '1') chip8.key[0x1] = 1; // Press X mapping to 1
    else if (key == '2') chip8.key[0x2] = 1; // Press 2 mapping to 2
    else if (key == '3') chip8.key[0x3] = 1; // Press 3 mapping to 3
    else if (key == '4') chip8.key[0xC] = 1; // Press 4 mapping to C

    else if (key == 'q') chip8.key[0x4] = 1; // Press q mapping to 4
    else if (key == 'w') chip8.key[0x5] = 1; // Press w mapping to 5
    else if (key == 'e') chip8.key[0x6] = 1; // Press e mapping to 6
    else if (key == 'r') chip8.key[0xD] = 1; // Press r mapping to D

    else if (key == 'a') chip8.key[0x7] = 1; // Press a mapping to 7
    else if (key == 's') chip8.key[0x8] = 1; // Press s mapping to 8
    else if (key == 'd') chip8.key[0x9] = 1; // Press d mapping to 9
    else if (key == 'f') chip8.key[0xE] = 1; // Press f mapping to E

    else if (key == 'z') chip8.key[0xA] = 1; // Press z mapping to A
    else if (key == 'x') chip8.key[0x0] = 1; // Press x mapping to 0
    else if (key == 'c') chip8.key[0xB] = 1; // Press c mapping to B
    else if (key == 'v') chip8.key[0xF] = 1; // Press v mapping to F
    else return;

}
void controllerUP(unsigned char key, int x, int y) {
    if (key == '1') chip8.key[0x1] = 0; // Press X mapping to 1
    else if (key == '2') chip8.key[0x2] = 0; // Press 2 mapping to 2
    else if (key == '3') chip8.key[0x3] = 0; // Press 3 mapping to 3
    else if (key == '4') chip8.key[0xC] = 0; // Press 4 mapping to C

    else if (key == 'q') chip8.key[0x4] = 0; // Press q mapping to 4
    else if (key == 'w') chip8.key[0x5] = 0; // Press w mapping to 5
    else if (key == 'e') chip8.key[0x6] = 0; // Press e mapping to 6
    else if (key == 'r') chip8.key[0xD] = 0; // Press r mapping to D

    else if (key == 'a') chip8.key[0x7] = 0; // Press a mapping to 7
    else if (key == 's') chip8.key[0x8] = 0; // Press s mapping to 8
    else if (key == 'd') chip8.key[0x9] = 0; // Press d mapping to 9
    else if (key == 'f') chip8.key[0xE] = 0; // Press f mapping to E

    else if (key == 'z') chip8.key[0xA] = 0; // Press z mapping to A
    else if (key == 'x') chip8.key[0x0] = 0; // Press x mapping to 0
    else if (key == 'c') chip8.key[0xB] = 0; // Press c mapping to B
    else if (key == 'v') chip8.key[0xF] = 0; // Press v mapping to F
    else return;
}
完成?
做到這裡基本上已經完成核心了,尤其是那血尿的指令集實作,接下來要完成的部分就是繪圖的部分與CHIP8核心做連結,這裡就不多提了。 Source : https://github.com/kaibaooo/Chip8_Emulator
CHIP8模擬器開發系列文章
- CHIP8模擬器開發-模擬器與CHIP8簡介
- CHIP8模擬器開發-指令集
- CHIP8模擬器開發-來寫程式吧
參考文章
- Cowgod’s Chip-8 Technical Reference v1.0
- CHIP-8 Wikipedia
- How to write an emulator (CHIP-8 interpreter)
 來源
來源