探討CUDA的4種記憶體存取方式

本篇文章探討NVIDIA CUDA架構下的記憶體存取方式對程式效能的影響,以下將介紹不同的記憶體存取方法對於不同的Kernel Function的效能影響,目前的CUDA C/C++ API提供了以下記憶體存取方法
- Pageable Memory
- Pinned Memory
- Zero Copy
- Unified Memory Access
Pageable Memory
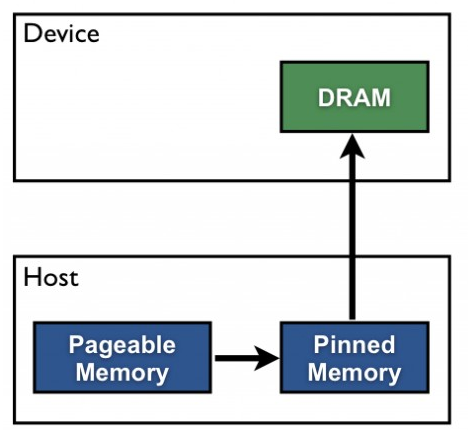
Pageable Memory為大多數CUDA教學當中會使用到的基本存取方法,先在Host Memory上宣告一塊記憶體(透過malloc),將要複製到Device Memory的資料先存放在此處,再經由cudaMemcpy()將該段記憶體空間的內容複製到事先宣告好的Device Memory上。
透過malloc()所宣告出來的連續記憶體空間是透過作業系統的Page Table所管理的,因此記憶體內的資料是有可能會被寫入到Swap當中的,這種記憶體特性稱為Pageable Memory。為了不讓資料從Host複製到Device時被寫進去Swap,CUDA API會隱性的將malloc分配出來的空間先複製一份到所謂的Pinned Memory(Page-Lock),最後Device才透過DMA(Direct Memory Access)的方式將資料從Host Pinned Memory搬動到Device Memory上。
 本圖引用自參考連結1
// Allocation
int *host_input_arr = (int*)malloc(sizeof(int) * elementSize);
int *host_output_arr = (int*)malloc(sizeof(int) * elementSize);
int *device_arr;
cudaMalloc((void**)&device_arr, sizeof(int) * elementSize);

// Data Transfer and Kernel Function
cudaMemcpy(device_arr, host_input_arr, sizeof(int) * elementSize, cudaMemcpyHostToDevice);
kernel<<<blockSize, threadsPerBlock>>>(device_arr, elementSize);
cudaDeviceSynchronize();
cudaMemcpy(host_output_arr, device_arr, sizeof(int) * elementSize, cudaMemcpyDeviceToHost);

// Free
cudaFree(device_arr);
free(host_input_arr);
free(host_output_arr);
Pinned Memory
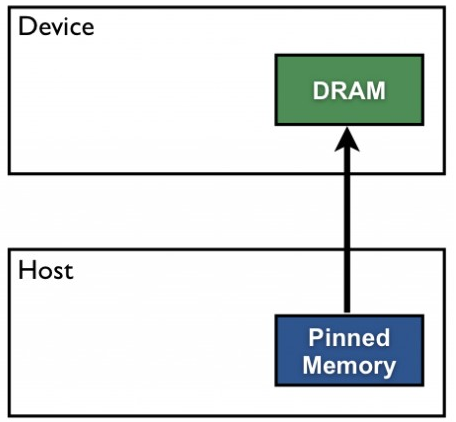
Pageable Memory最主要的問題是Host端的記憶體會在內部多一次的資料複製,但其實這段時間是可以省略掉的,因此CUDA提供了直接使用Pinned Memory的機制,不使用原生的malloc()函式,直接透過CUDA API當中的cudaMallocHost()函式把要傳輸到Device資料直接放在Host Pinned Memory當中,執行cudaMemcpy()函式時就可以直接以DMA的方式搬動資料到Device上。
聽起來Pinned Memory相較於Pageable Memory的存取方式只有好沒有壞,但魔鬼藏在細節裡!如前面所提到,Pinned Memory是屬於Page-Lock的記憶體,不會被寫到Swap當中,因此對於記憶體的消耗其實是相當大的,屬於稀缺資源的一種,若過度使用Pinned Memory會占用許多Host應有的記憶體空間。
 本圖引用自參考連結1
// Allocation
int *host_input_arr;
int *host_output_arr;
int *device_arr;
cudaMallocHost((void**)&host_input_arr, sizeof(int) * elementSize, cudaHostAllocDefault);
cudaMallocHost((void**)&host_output_arr, sizeof(int) * elementSize, cudaHostAllocDefault);
cudaMalloc((void**)&device_arr, sizeof(int) * elementSize);

// Data Transfer and Kernel Function
cudaMemcpy(device_arr, host_input_arr, sizeof(int) * elementSize, cudaMemcpyHostToDevice);
vecMultiply<<<blockSize, threadsPerBlock>>>(device_arr, elementSize);
cudaDeviceSynchronize();
cudaMemcpy(host_output_arr, device_arr, sizeof(int) * elementSize, cudaMemcpyDeviceToHost);

// Free
cudaFree(device_arr);
cudaFreeHost(host_input_arr);
cudaFreeHost(host_output_arr);
Zero Copy
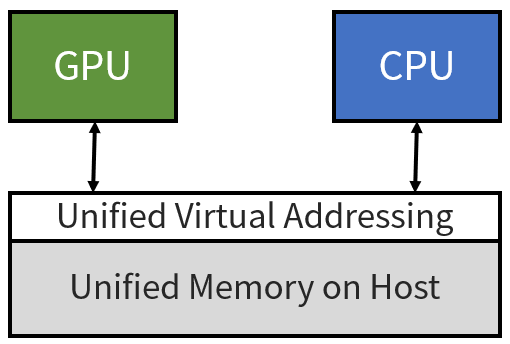
Zero Copy是透過Unified Virtual Addressing(UVA)的方式將Host端的位址空間映射到Device Memory上,GPU使用該段記憶體時會透過DMA的方式直接存取Host端上的記憶體空間,簡化了CPU和GPU間的記憶體機制。但Zero Copy有兩大缺點,第一點是相較於VRAM本身內部的高頻寬(200GB/s以上),PCIE僅有15.8GB/s的頻寬(PCIE 3.0x16),記憶體存取速度上顯然會在此出現瓶頸;第二點為Zero Copy的存取機制為on-demand,需要時才從Host Memory存取,存取後不會放在Device端的cache當中,在重複存取相同記憶體位址上效能會相當差,每次都須透過PCIE重新存取一次資料。

// Allocation
int *host_input_arr;
cudaHostAlloc((void**)&host_input_arr, sizeof(int) * elementSize, cudaHostAllocMapped);
cudaHostGetDevicePointer((void **)&device_input_arr,  (void *) host_input_arr , 0);

// Kernel Function
vecMultiply<<<blockSize, threadsPerBlock>>>(device_input_arr, elementSize);
cudaDeviceSynchronize();

// Free
cudaFree(device_input_arr);
Unified Memory Access(UMA)
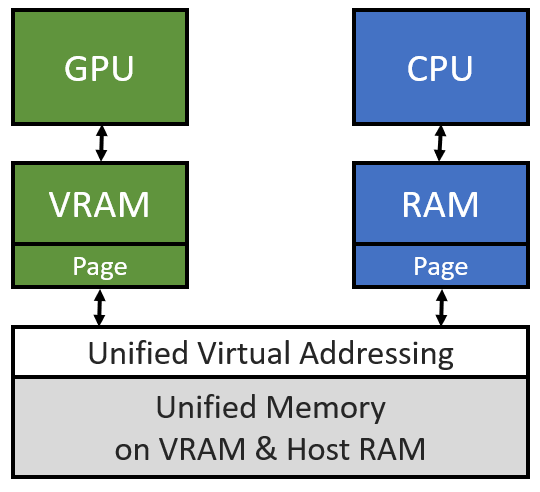
Unified Memory Access(UMA)使用到的記憶體定址技術與Zero Copy所使用的UVA相同,但細節上有所不同。UMA當中Host端與Device端都會各自管理一張Page Table,當需要某個Page但卻發生Page Fault時才會做Host與Device之間的資料交換(on-demand),若Page Table中有需要的資料就可以直接從需求端自身的UVA位址當中取得資料,重複存取上相較起來就會快很多(類似Cache的概念),詳細內容可以參考以下PPT。

// Allocation
int *host_input_arr;
cudaMallocManaged((void**)&host_input_arr, sizeof(int) * elementSize);

// Kernel Function
vecMultiply<<<blockSize, threadsPerBlock>>>(host_input_arr, elementSize);
cudaDeviceSynchronize();

// Free
cudaFree(host_input_arr);
結論
根據上述的介紹,我們可以整理出下表
 以上四種方法各有特色,沒有最好的選擇,可依照自己開發的kernel function特性做適當的選擇。
以上四種存取方法的完整程式碼也有放在我的Github,有興趣的人可以參考參考 https://github.com/kaibaooo/CUDA-Memory-Access-Pattern-Sample